文章大纲
OpenShift 部署流程和节点的规划
本文参考官方手册以使用最低资源要求构建一个 OpenShift 集群。
用于部署的节点可以是 VM(可以是多个节点) 也可以是物理机。
部署流程
部署 OpenShift 集群的核心过程和相关节点角色如下:
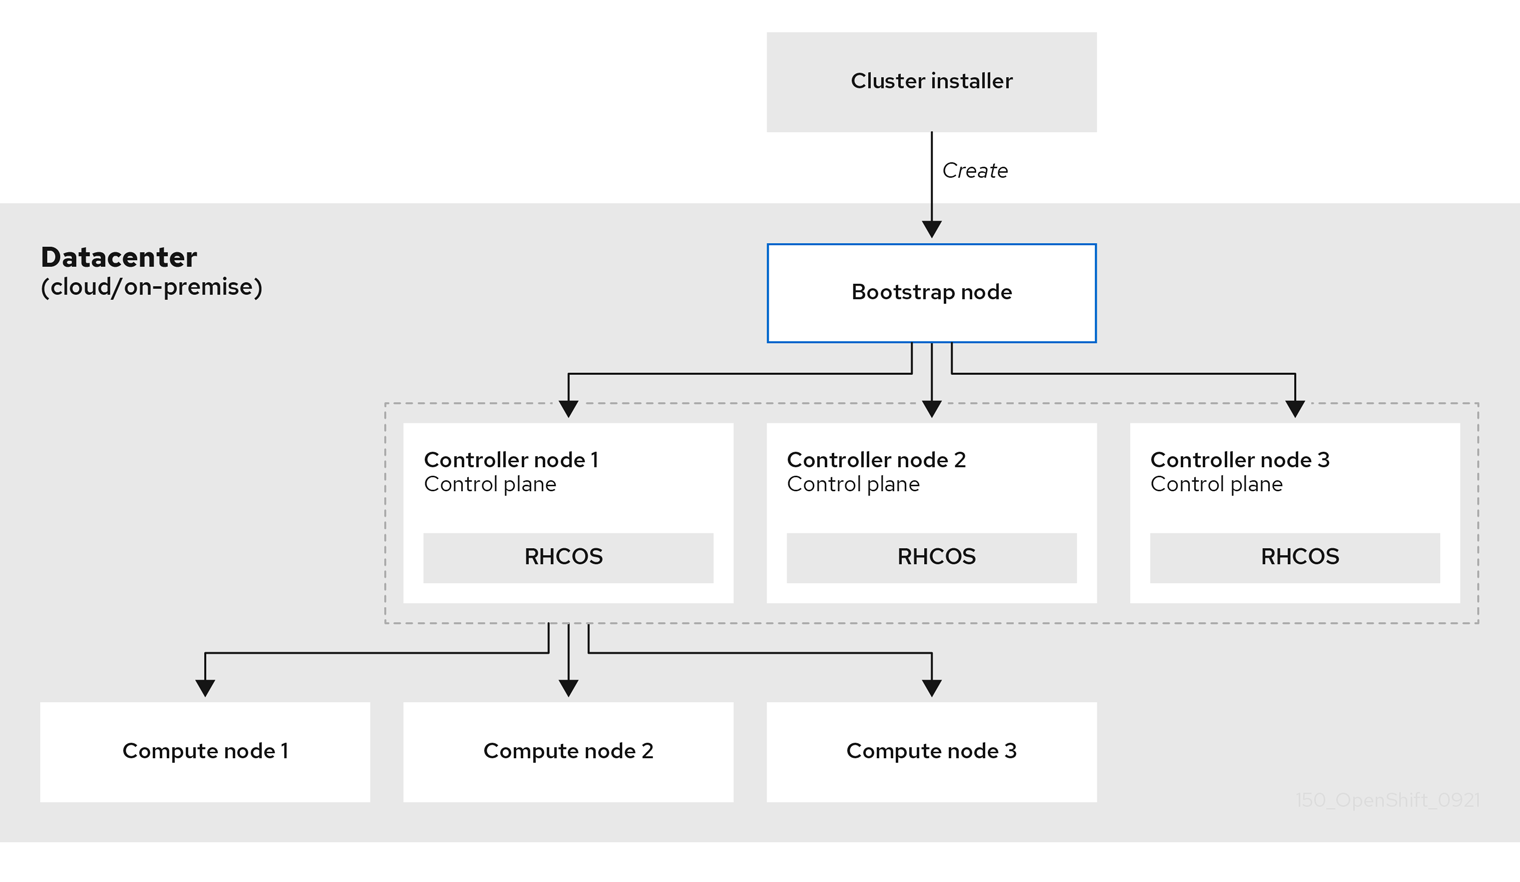
bootstrapp 集群涉及以下步骤:
- bootstrap 机器启动并开始托管 control plane 机器引导所需的远程资源。(如果自己配置基础架构,则需要人工干预)
- bootstrap 机器启动单节点 etcd 集群和一个临时 Kubernetes control plane。
- control plane 机器从 bootstrap 机器获取远程资源并完成启动。(如果自己配置基础架构,则需要人工干预)
- 临时 control plane 将生产环境的 control plane 调度到生产环境 control plane 机器。
- Cluster Version Operator(CVO)在线并安装 etcd Operator。etcd Operator 在所有 control plane 节点上扩展 etcd。
- 临时 control plane 关机,并将控制权交给生产环境 control plane。
- bootstrap 机器将 OpenShift Container Platform 组件注入生产环境 control plane。
- 安装程序关闭 bootstrap 机器。(如果自己配置基础架构,则需要人工干预)
- control plane 设置 compute 节点。
- control plane 以一组 Operator 的形式安装其他服务。
节点角色规划
| 主机名 | 功能角色 |
|---|---|
| support | DNS NTP HAProxy Image Registry(缓存 OpenShift 安装所需的镜像) Cluster Installer |
| bootstrap | 安装初始化,引导 master 完成后可以关闭该节点 |
| master01 | OCP Cluster Master/Etcd Node |
| master02 | OCP Cluster Master/Etcd Node |
| master03 | OCP Cluster Master/Etcd Node |
| worker01 | OCP Cluster Worker Node |
| worker02 | OCP Cluster Worker Node |
节点资源规划
| Hostname | OS | CPU(Core) | MEM(GB) | DISK(GB) |
|---|---|---|---|---|
| support | RHEL 8.7 | 4 | 8 | 200 |
| bootstrap | RHCOS | 8 | 16 | 100 |
| master01 | RHCOS | 8 | 16 | 120 |
| master02 | RHCOS | 8 | 16 | 120 |
| master03 | RHCOS | 8 | 16 | 120 |
| worker01 | RHCOS | 8 | 16 | 100 |
| worker02 | RHCOS | 8 | 16 | 100 |
节点网络规划
| Hostname | IP | GW | DNS |
|---|---|---|---|
| support | 172.25.1.10/24 | 172.25.1.254 | 172.25.100.100(指向本身) |
| bootstrap | 172.25.1.20/24 | ||
| master01 | 172.25.1.11/24 | ||
| master02 | 172.25.1.12/24 | ||
| master03 | 172.25.1.13/24 | ||
| worker01 | 172.25.1.21/24 | ||
| worker02 | 172.25.1.22/24 |
DNS 域名解析规划
| DNS Part | Value |
|---|---|
| BASE_DOMAIN | ocp.icu |
| OCP_CLUSTER_ID | ocp4 |
| DNS Name | A Record |
|---|---|
| support.ocp.icu | 172.25.1.10 |
| dns.ocp.icu | 172.25.1.10 |
| api.ocp4.ocp.icu | 172.25.1.10 |
| api-int.ocp4.ocp.icu | 172.25.1.10 |
| *.apps.ocp4.ocp.icu | 172.25.1.10 |
| bootstrap.ocp4.ocp.icu | 172.25.1.20 |
| master01.ocp4.ocp.icu | 172.25.1.11 |
| master02.ocp4.ocp.icu | 172.25.1.12 |
| master03.ocp4.ocp.icu | 172.25.1.13 |
| worker01.ocp4.ocp.icu | 172.25.1.21 |
| worker02.ocp4.ocp.icu | 172.25.1.22 |
安装和配置 support 节点
按照以下要求安装 support 节点:
- 安装节点资源规划配置节点资源
- 最小化安装 RHEL 8.7
- 按照节点网络规划设置网络
- 安装时将磁盘空间全部分配给
/
将 CDROM 挂载,并配置成 YUM 源:
[root@support ~]# mkdir /mnt/yum
[root@support ~]# echo "/dev/sr0 /mnt/yum iso9660 defaults 0 0" >> /etc/fstab
[root@support ~]# mount -a
mount: /mnt/yum: WARNING: device write-protected, mounted read-only.

[root@support ~]# cat >> /etc/yum.repos.d/rhel_dvd.repo << EOF
[BaseOS]
name=BaseOS
baseurl=file:///mnt/yum/BaseOS
gpgcheck=0
enabled=1

[AppStream]
name=AppStream
baseurl=file:///mnt/yum/AppStream
gpgcheck=0
enabled=1
EOF

[root@support ~]# dnf repolist
Updating Subscription Management repositories.
Unable to read consumer identity

This system is not registered with an entitlement server. You can use subscription-manager to register.

repo id                                           repo name
AppStream                                         AppStream
BaseOS                                            BaseOS
关闭 firewalld 和 SELinux:
[root@support ~]# systemctl disable --now firewalld
[root@support ~]# setenforce 0
[root@support ~]# sed -i 's/^SELINUX=.*/SELINUX=permissive/' /etc/selinux/config
配置基础架构-NTP
安装 chrony :
[root@support ~]# dnf install chrony -y备份原始的 chrony.conf 配置文件,再修改配置文件:
[root@support ~]# cp /etc/chrony.conf{,.bak}

[root@support ~]# sed -i -e "s/^server*/#&/g" \
-e "s/#local stratum 10/local stratum 10/g" \
-e "s/#allow 172.25.0.0\/16/allow all/g" \
/etc/chrony.conf

[root@support ~]# systemctl enable --now chronyd
配置基础架构-DNS
OCP4 建议的域名构成为:集群名+根域名 $OCP_CLUSTER_ID.$BASE_DOMAIN
安装 BIND 服务
[root@support ~]# dnf install -y bind bind-utils设置 BIND 配置文件
配置 forward 和 允许所有客户端可查询
[root@support ~]# cp /etc/named.conf{,.bak}


[root@support ~]# sed -i -e "s/listen-on port.*/listen-on port 53 { any; };/" /etc/named.conf
[root@support ~]# sed -i -e "s/allow-query.*/allow-query { any; };/" /etc/named.conf
[root@support ~]# sed -i '/recursion yes;/a forward first; forwarders { 114.114.114.114; 8.8.8.8; };' /etc/named.conf
[root@support ~]# sed -i -e "s/dnssec-enable.*/dnssec-enable no;/" /etc/named.conf
[root@support ~]# sed -i -e "s/dnssec-validation.*/dnssec-validation no;/" /etc/named.conf
配置 Zone 区域
添加三个解析 Zone,Zone 的规划如下:
| 域名后缀 | 描述 |
|---|---|
| ocp.icu | 集群内部域名后缀,集群所有节点的主机名都使用此后缀 |
| ocp4.ocp.icu | OCP 集群的域名 |
| 25.172.in-addr.arpa | 集群内所有节点的反向解析 |
[root@support ~]# cat >> /etc/named.rfc1912.zones << EOF
zone "ocp.icu" IN {
        type master;
        file "ocp.icu.zone";
        allow-transfer { any; };
};

zone "ocp4.ocp.icu" IN {
        type master;
        file "ocp4.ocp.icu.zone";
        allow-transfer { any; };
};

zone "25.172.in-addr.arpa" IN {
        type master;
        file "25.172.in-addr.arpa.zone";
        allow-transfer { any; };
};
EOF
创建 ocp.icu 区域配置文件:
[root@support ~]# cat /var/named/ocp.icu.zone
$ORIGIN ocp.icu.
$TTL 1D
@       IN SOA ocp.icu. admin.ocp.icu. (
                0       ;serial
                1D      ;refresh
                1H      ;retry
                1W      ;expire
                3H )     ;minimum

@       IN      NS      dns.ocp.icu.
support IN      A       172.25.1.10
dns     IN      A       172.25.1.10
创建 ocp4.ocp.icu 区域配置文件:
root@support ~]# cat /var/named/ocp4.ocp.icu.zone
$ORIGIN ocp4.ocp.icu.
$TTL 1D
@       IN SOA ocp4.ocp.icu. admin.ocp4.ocp.icu. (
                0       ;serial
                1D      ;refresh
                1H      ;retry
                1W      ;expire
                3H )     ;minimum

@       IN      NS      dns.ocp.icu.
api     IN      A       172.25.1.10
api-int IN      A       172.25.1.10
*.apps  IN      A       172.25.1.10

bootstrap        IN      A       172.25.1.20
master01        IN      A       172.25.1.11
master02        IN      A       172.25.1.12
master03        IN      A       172.25.1.13
worker01        IN      A       172.25.1.21
worker02        IN      A       172.25.1.22
创建 25.172.in-addr.arpa.zone 反向解析区域配置文件:
[root@support ~]# cat /var/named/25.172.in-addr.arpa.zone
$TTL 1D
@       IN SOA ocp.icu. admin.ocp.icu. (
                0       ;serial
                1D      ;refresh
                1H      ;retry
                1W      ;expire
                3H )     ;minimum

@       IN      NS      dns.ocp.icu.
10.1.25.172.in-addr.arpa. IN PTR support.ocp.icu.
10.1.25.172.in-addr.arpa. IN PTR dns.ocp.icu.
10.1.25.172.in-addr.arpa. IN PTR api.ocp4.ocp.icu.
10.1.25.172.in-addr.arpa. IN PTR api-int.ocp4.ocp.icu.


20.1.25.172.in-addr.arpa. IN PTR bootstrap.ocp4.ocp.icu.
11.1.25.172.in-addr.arpa. IN PTR master01.ocp4.ocp.icu.
12.1.25.172.in-addr.arpa. IN PTR master02.ocp4.ocp.icu.
13.1.25.172.in-addr.arpa. IN PTR master03.ocp4.ocp.icu.
21.1.25.172.in-addr.arpa. IN PTR worker01.ocp4.ocp.icu.
22.1.25.172.in-addr.arpa. IN PTR worker02.ocp4.ocp.icu.
启动 BIND 服务:
[root@support ~]# systemctl enable --now named将 support 节点的 DNS 配置指向自己
root@support ~]# nmcli con s
NAME   UUID                                  TYPE      DEVICE
ens34  77efd8de-3841-4cc0-bb2f-7193344f7dcc  ethernet  ens34
[root@support ~]# nmcli con modify ens34 ipv4.dns 172.25.1.10
[root@support ~]# nmcli con up ens34
测试正反向 DNS 解析:
正向解析:
[root@support ~]# dig quay.io +short
52.0.72.224
34.238.89.100
34.196.214.29
[root@support ~]# dig api.ocp4.ocp.icu +short
172.25.1.10
[root@support ~]# dig api-int.ocp4.ocp.icu +short
172.25.1.10
[root@support ~]# dig xxx.apps.ocp4.ocp.icu +short
172.25.1.10
[root@support ~]# dig master01.ocp4.ocp.icu  +short
172.25.1.11
[root@support ~]# dig worker01.ocp4.ocp.icu  +short
172.25.1.21
[root@support ~]# dig bootstrap.ocp4.ocp.icu  +short
172.25.1.20
反向解析:
[root@support ~]# dig -x 172.25.1.20 +short
bootstrap.ocp4.ocp.icu.
[root@support ~]# dig -x 172.25.1.21 +short
worker01.ocp4.ocp.icu.
[root@support ~]# dig -x 172.25.1.22 +short
worker02.ocp4.ocp.icu.
[root@support ~]# dig -x 172.25.1.11 +short
master01.ocp4.ocp.icu.
[root@support ~]# dig -x 172.25.1.12 +short
master02.ocp4.ocp.icu.
[root@support ~]# dig -x 172.25.1.13 +short
master03.ocp4.ocp.icu.
[root@support ~]# dig -x 172.25.1.10 +short
dns.ocp.icu.
api.ocp4.ocp.icu.
api-int.ocp4.ocp.icu.
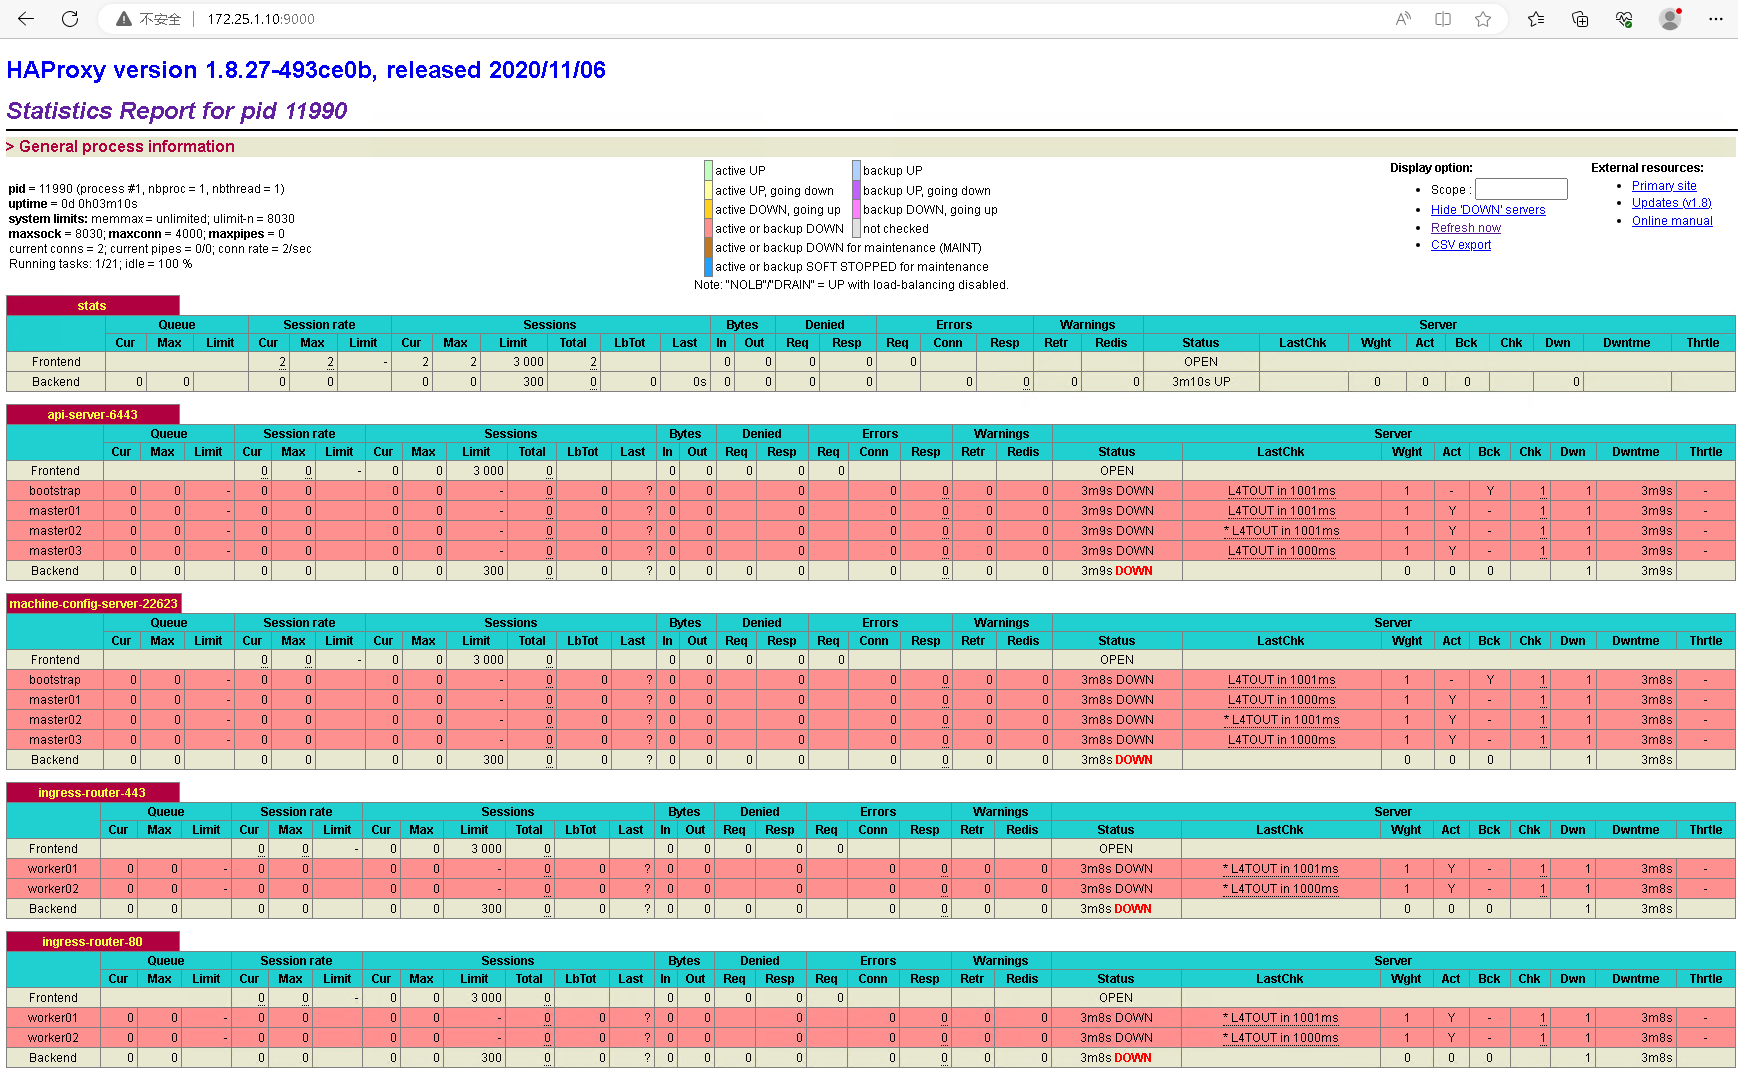
support.ocp.icu.配置基础架构-HAProxy
根据 OCP 集群需求,需要在 Haproxy 的前后端配置以下端口:
API 负载均衡配置:
| port | backend | describe |
|---|---|---|
| 6443 | Bootstrap 和 control plane. bootstrap 在初始化集群后需要移除 | Kubernetes API Server |
| 22623 | Bootstrap 和 control plane. bootstrap 在初始化集群后需要移除 | Machine Config Server |
应用入口负载均衡配置:
| port | backend | describe |
|---|---|---|
| 443 | 运行 ingress controller 或 worker node | https 流量 |
| 80 | 运行 ingress controller 或 worker node | http 流量 |
安装 Haproxy:
[root@support ~]# dnf install haproxy -y配置 Haproxy:
[root@support ~]# cat /etc/haproxy/haproxy.cfg
global
  log         127.0.0.1 local2
  pidfile     /var/run/haproxy.pid
  maxconn     4000
  daemon
defaults
  mode                    http
  log                     global
  option                  dontlognull
  option http-server-close
  option                  redispatch
  retries                 3
  timeout http-request    10s
  timeout queue           1m
  timeout connect         10s
  timeout client          1m
  timeout server          1m
  timeout http-keep-alive 10s
  timeout check           10s
  maxconn                 3000
listen stats
  bind :9000
  mode http
  stats enable
  stats uri /
listen api-server-6443
  bind *:6443
  mode tcp
  server bootstrap bootstrap.ocp4.ocp.icu:6443 check inter 1s backup
  server master01 master01.ocp4.ocp.icu:6443 check inter 1s
  server master02 master02.ocp4.ocp.icu:6443 check inter 1s
  server master03 master03.ocp4.ocp.icu:6443 check inter 1s
listen machine-config-server-22623
  bind *:22623
  mode tcp
  server bootstrap bootstrap.ocp4.ocp.icu:22623 check inter 1s backup
  server master01 master01.ocp4.ocp.icu:22623 check inter 1s
  server master02 master02.ocp4.ocp.icu:22623 check inter 1s
  server master03 master03.ocp4.ocp.icu:22623 check inter 1s
listen ingress-router-443
  bind *:443
  mode tcp
  balance source
  server worker01 worker01.ocp4.ocp.icu:443 check inter 1s
  server worker02 worker02.ocp4.ocp.icu:443 check inter 1s
listen ingress-router-80
  bind *:80
  mode tcp
  balance source
  server worker01 worker01.ocp4.ocp.icu:80 check inter 1s
  server worker02 worker02.ocp4.ocp.icu:80 check inter 1s
启动 Haproxy:
[root@support ~]# systemctl enable --now haproxy访问 support.ocp.icu:9000 验证状态,状态都是 down ,因为后端还没有部署服务,在后续阶段部署完后端服务后,状态页面将是 up 的: