文章大纲
准备定制安装文件
生成密钥对文件,用于后续免密登录 CoreOS :
[root@support ~]# ssh-keygen
Generating public/private rsa key pair.
Enter file in which to save the key (/root/.ssh/id_rsa):
Enter passphrase (empty for no passphrase):
Enter same passphrase again:
Your identification has been saved in /root/.ssh/id_rsa.
Your public key has been saved in /root/.ssh/id_rsa.pub.
The key fingerprint is:
SHA256:HRRTXwtI/fLd/sjKP6xccYL+dIt9SDBv+gh0uI4Tj0Q root@support
The key's randomart image is:
+---[RSA 3072]----+
|          =++.  .|
|         . o o...|
|          .   o. |
|        E. ooo . |
|       .S + o+= +|
|        o. +  +=o|
|       . +o .=oo.|
|        oo.+.**o+|
|        ... ***++|
+----[SHA256]-----+
准备 Ignition 引导文件
通过链接:https://mirror.openshift.com/pub/openshift-v4/x86_64/clients/ocp/4.14.6/openshift-install-linux-4.14.6.tar.gz 下载 OpenShift for x8_64 Installer ,下载完成后进行安装:
[root@support ~]# tar xf openshift-install-linux-4.14.6.tar.gz -C /usr/local/sbin/创建存放 ign 文件的目录:
[root@support ~]# mkdir ocp4/ign -p在该目录下创建 install-config.yaml 文件:
[root@support ~]# export SSH_PUB_KEY=$(cat ~/.ssh/id_rsa.pub)
[root@support ~]# export PULLSEC=$(cat /root/pull-secret-done.txt)
[root@support ~]# cat <<EOF > ocp4/ign/install-config.yaml
apiVersion: v1
baseDomain: ocp.icu
compute:
        - hyperthreading: Enabled
          name: worker
          replicas: 0
controlPlane:
        hyperthreading: Enabled
        name: master
        replicas: 3
metadata:
        name: ocp4
networking:
        clusterNetwork:
                - cidr: 10.128.0.0/14
                  hostPrefix: 23
        networkType: OVNKubernetes
        serviceNetwork:
                - 172.30.0.0/16
platform:
        none: {}
fips: false
pullSecret: '${PULLSEC}'
sshKey: '${SSH_PUB_KEY}'
imageContentSources:
- mirrors:
  - support.ocp.icu:8443/ocp4/openshift4
  source: quay.io/openshift-release-dev/ocp-release
- mirrors:
  - support.ocp.icu:8443/ocp4/openshift4
  source: quay.io/openshift-release-dev/ocp-v4.0-art-dev
EOF
install-conf.yaml 文件中还需附加注册表的证书:
[root@support ~]# cp /var/quay/quay-rootCA/rootCA.pem ocp4/ign/
[root@support ~]# sed -i -e 's/^/  /' ocp4/ign/rootCA.pem
[root@support ~]# echo "additionalTrustBundle: |" >> ocp4/ign/install-config.yaml
[root@support ~]# cat ocp4/ign/rootCA.pem >> ocp4/ign/install-config.yaml
生成 manifest 文件
OCP 集群会在节点启动后根据 manifest 文件生成的 Ignition 设置各个节点的系统配置:
[root@support ~]# openshift-install create manifests --dir ocp4/ign/
INFO Consuming Install Config from target directory
INFO Manifests created in: ocp4/ign/manifests and ocp4/ign/openshift

[root@support ~]# tree ocp4/ign/
ocp4/ign/
├── manifests
│   ├── cluster-config.yaml
│   ├── cluster-dns-02-config.yml
│   ├── cluster-infrastructure-02-config.yml
│   ├── cluster-ingress-02-config.yml
│   ├── cluster-network-01-crd.yml
│   ├── cluster-network-02-config.yml
│   ├── cluster-proxy-01-config.yaml
│   ├── cluster-scheduler-02-config.yml
│   ├── cvo-overrides.yaml
│   ├── kube-cloud-config.yaml
│   ├── kube-system-configmap-root-ca.yaml
│   ├── machine-config-server-tls-secret.yaml
│   └── openshift-config-secret-pull-secret.yaml
└── openshift
    ├── 99_kubeadmin-password-secret.yaml
    ├── 99_openshift-cluster-api_master-user-data-secret.yaml
    ├── 99_openshift-cluster-api_worker-user-data-secret.yaml
    ├── 99_openshift-machineconfig_99-master-ssh.yaml
    ├── 99_openshift-machineconfig_99-worker-ssh.yaml
    └── openshift-install-manifests.yaml

2 directories, 19 files
在 maifests/cluster-scheduler-02-config.yml 中可设置 master 节点是否可以运行用户的负载,默认是允许,可以修改为禁止:
[root@support ign]# cat manifests/cluster-scheduler-02-config.yml
apiVersion: config.openshift.io/v1
kind: Scheduler
metadata:
  creationTimestamp: null
  name: cluster
spec:
  mastersSchedulable: true
  policy:
    name: ""
status: {}
[root@support ign]# sed -i 's/mastersSchedulable: true/mastersSchedulable: false/g' manifests/cluster-scheduler-02-config.yml
[root@support ign]# cat manifests/cluster-scheduler-02-config.yml
apiVersion: config.openshift.io/v1
kind: Scheduler
metadata:
  creationTimestamp: null
  name: cluster
spec:
  mastersSchedulable: false
  policy:
    name: ""
status: {}
为节点创建 NTP 配置文件:
[root@support ~]# cat ntp.conf
server 172.25.1.10 iburst
driftfile /var/lib/chrony/drift
makestep 1.0 3
rtcsync
logdir /var/log/chrony

[root@support ~]# export NTP_CONF=$(cat ntp.conf|base64 -w 0)
[root@support ~]# echo $NTP_CONF
c2VydmVyIDE3Mi4yNS4xLjEwIGlidXJzdApkcmlmdGZpbGUgL3Zhci9saWIvY2hyb255L2RyaWZ0Cm1ha2VzdGVwIDEuMCAzCnJ0Y3N5bmMKbG9nZGlyIC92YXIvbG9nL2Nocm9ueQo=
创建针对 master 的NTP配置文件:
[root@support ~]# cat << EOF > ocp4/ign/openshift/99_masters-chrony-configuration.yaml
apiVersion: machineconfiguration.openshift.io/v1
kind: MachineConfig
metadata:
  labels:
    machineconfiguration.openshift.io/role: master
  name: masters-chrony-configuration
spec:
  config:
    ignition:
      config: {}
      security:
        tls: {}
      timeouts: {}
      version: 3.2.0
    networkd: {}
    passwd: {}
    storage:
      files:
        - contents:
            source: data:text/plain;charset=utf-8;base64,${NTP_CONF}
          mode: 420
          overwrite: true
          path: /etc/chrony.conf
  osImageURL: ""
EOF
创建针对 worker 的NTP配置文件:
[root@support ~]# cat << EOF > ocp4/ign/openshift/99_workers-chrony-configuration.yaml
apiVersion: machineconfiguration.openshift.io/v1
kind: MachineConfig
metadata:
  labels:
    machineconfiguration.openshift.io/role: worker
  name: workers-chrony-configuration
spec:
  config:
    ignition:
      config: {}
      security:
        tls: {}
      timeouts: {}
      version: 3.2.0
    networkd: {}
    passwd: {}
    storage:
      files:
        - contents:
            source: data:text/plain;charset=utf-8;base64,${NTP_CONF}
          mode: 420
          overwrite: true
          path: /etc/chrony.conf
  osImageURL: ""
EOF
生成 Ignition 文件
备份 ign 目录,然后创建 Ignition 引导文件:
[root@support ~]# cp -r ocp4/ign/ ocp4/ign-bak
[root@support ~]# openshift-install create ignition-configs --dir ocp4/ign
INFO Consuming Common Manifests from target directory
INFO Consuming OpenShift Install (Manifests) from target directory
INFO Consuming Worker Machines from target directory
INFO Consuming Master Machines from target directory
INFO Consuming Openshift Manifests from target directory
INFO Ignition-Configs created in: ocp4/ign and ocp4/ign/auth

[root@support ~]# tree ocp4/ign
ocp4/ign
├── auth
│   ├── kubeadmin-password
│   └── kubeconfig
├── bootstrap.ign
├── master.ign
├── metadata.json
└── worker.ign

1 directory, 6 files
准备节点自动设置文件
创建 bootstrap 启动配置文件:
[root@support ~]# cat ocp4/ign/set-bootstrap
nmcli connection modify "Wired connection 1" ipv4.address 172.25.1.20/24
nmcli connection modify "Wired connection 1" ipv4.dns 172.25.1.10
nmcli connection modify "Wired connection 1" ipv4.gateway 172.25.1.254
nmcli connection modify "Wired connection 1" ipv4.method manual
nmcli connection down "Wired connection 1"
nmcli connection up "Wired connection 1"

sudo coreos-installer install /dev/sda --insecure-ignition --ignition-url=http://support.ocp.icu:8080/ign/bootstrap.ign --copy-network

[root@support ~]# cat ocp4/ign/set-master01
nmcli connection modify "Wired connection 1" ipv4.address 172.25.1.11/24
nmcli connection modify "Wired connection 1" ipv4.dns 172.25.1.10
nmcli connection modify "Wired connection 1" ipv4.gateway 172.25.1.254
nmcli connection modify "Wired connection 1" ipv4.method manual
nmcli connection down "Wired connection 1"
nmcli connection up "Wired connection 1"

sudo coreos-installer install /dev/sda --insecure-ignition --ignition-url=http://support.ocp.icu:8080/ign/master.ign --copy-network

[root@support ~]# cat ocp4/ign/set-master02
nmcli connection modify "Wired connection 1" ipv4.address 172.25.1.12/24
nmcli connection modify "Wired connection 1" ipv4.dns 172.25.1.10
nmcli connection modify "Wired connection 1" ipv4.gateway 172.25.1.254
nmcli connection modify "Wired connection 1" ipv4.method manual
nmcli connection down "Wired connection 1"
nmcli connection up "Wired connection 1"

sudo coreos-installer install /dev/sda --insecure-ignition --ignition-url=http://support.ocp.icu:8080/ign/master.ign --copy-network
[root@support ~]# cat ocp4/ign/set-master03
nmcli connection modify "Wired connection 1" ipv4.address 172.25.1.13/24
nmcli connection modify "Wired connection 1" ipv4.dns 172.25.1.10
nmcli connection modify "Wired connection 1" ipv4.gateway 172.25.1.254
nmcli connection modify "Wired connection 1" ipv4.method manual
nmcli connection down "Wired connection 1"
nmcli connection up "Wired connection 1"

sudo coreos-installer install /dev/sda --insecure-ignition --ignition-url=http://support.ocp.icu:8080/ign/master.ign --copy-network

[root@support ~]# cat ocp4/ign/set-worker01
nmcli connection modify "Wired connection 1" ipv4.address 172.25.1.21/24
nmcli connection modify "Wired connection 1" ipv4.dns 172.25.1.10
nmcli connection modify "Wired connection 1" ipv4.gateway 172.25.1.254
nmcli connection modify "Wired connection 1" ipv4.method manual
nmcli connection down "Wired connection 1"
nmcli connection up "Wired connection 1"

sudo coreos-installer install /dev/sda --insecure-ignition --ignition-url=http://support.ocp.icu:8080/ign/worker.ign --copy-network
[root@support ~]# cat ocp4/ign/set-worker02
nmcli connection modify "Wired connection 1" ipv4.address 172.25.1.22/24
nmcli connection modify "Wired connection 1" ipv4.dns 172.25.1.10
nmcli connection modify "Wired connection 1" ipv4.gateway 172.25.1.254
nmcli connection modify "Wired connection 1" ipv4.method manual
nmcli connection down "Wired connection 1"
nmcli connection up "Wired connection 1"

sudo coreos-installer install /dev/sda --insecure-ignition --ignition-url=http://support.ocp.icu:8080/ign/worker.ign --copy-network
创建 Web 服务以支持 ign 的下载
[root@support ~]# dnf install -y httpd
[root@support ~]# sed -i 's/Listen 80/Listen 8080/g' /etc/httpd/conf/httpd.conf
[root@support ~]# systemctl enable --now httpd
Created symlink /etc/systemd/system/multi-user.target.wants/httpd.service → /usr/lib/systemd/system/httpd.service.

[root@support ~]# cp -r ocp4/ign  /var/www/html/
[root@support ~]# chmod +r -R /var/www/html/ign/
验证所有 ign 文件能被下载:
root@support ~]# curl http://support.ocp.icu:8080/ign/worker.ign | jq .创建 Bootstrap Master Worker 节点
下载 rhcos,地址:https://mirror.openshift.com/pub/openshift-v4/dependencies/rhcos/4.14/latest/rhcos-4.14.0-x86_64-live.x86_64.iso
按照表格规则创建 Bootstrap Master Worker 六台节点,并使用下载的 rhcos 映像进行引导。
安装 OCP 集群
经过前期的准备,后续安装集群要容易的多,只需耐心等待自动部署完成。
第一阶段:启动 bootstrap 和 master worker 节点
依次启动 bootstrap 和 master 和 worker 节点。
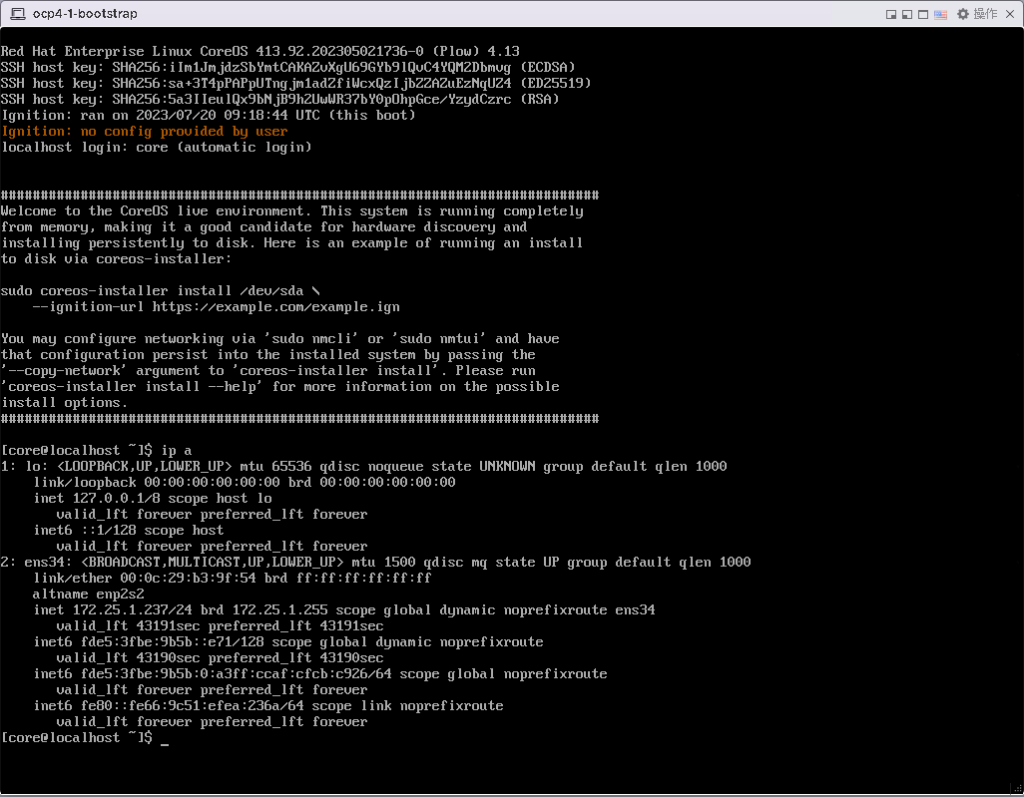
查看网络信息,如果环境中没有 DHCP,需手动执行 nmtui 工具配置网络,网络信息可按照规划表格进行配置。
执行:
curl -O http://172.25.1.10:8080/ign/set-bootstrap
source set-bootstrap
reboot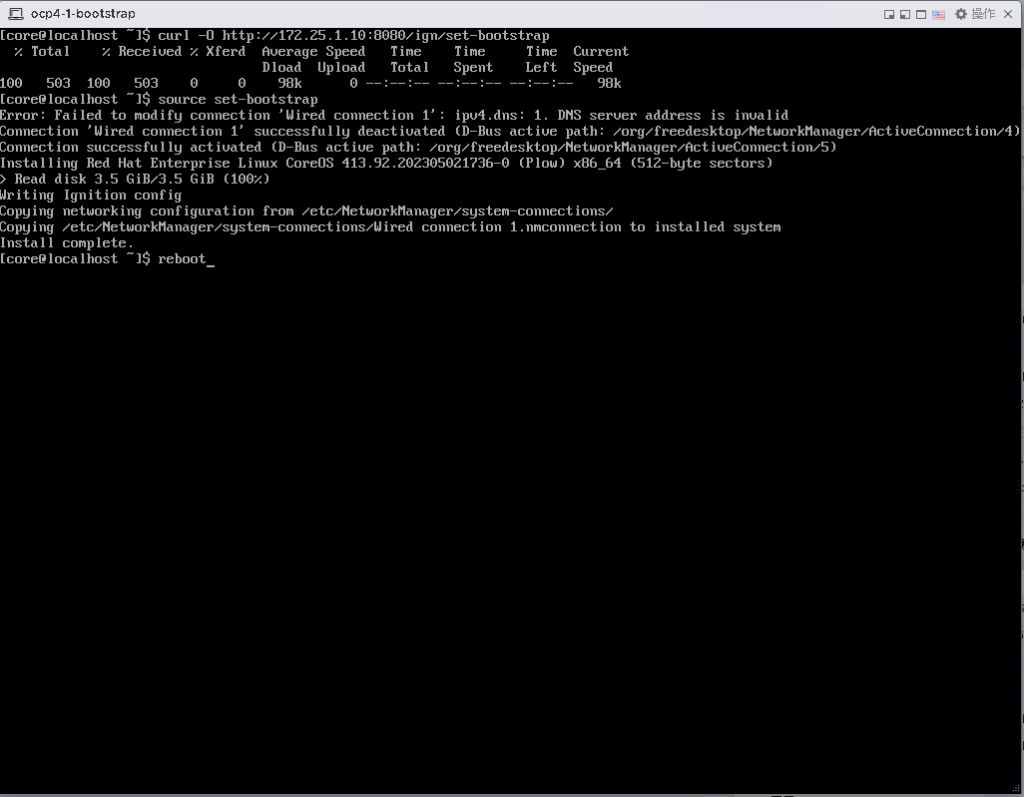
三个 master 节点的配置文件名分别为 set-master01 set-master02 set-master03 重复执行上述步骤。
二个 worker 节点的配置文件名分别为 set-worker01 set-worker02 重复执行上述步骤。
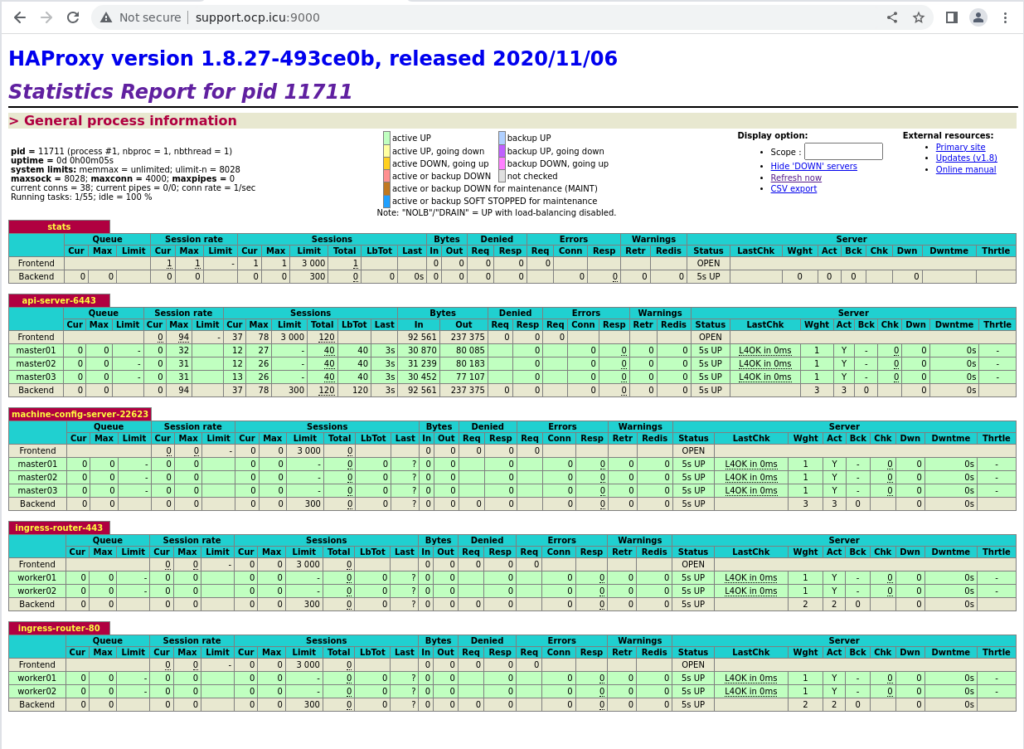
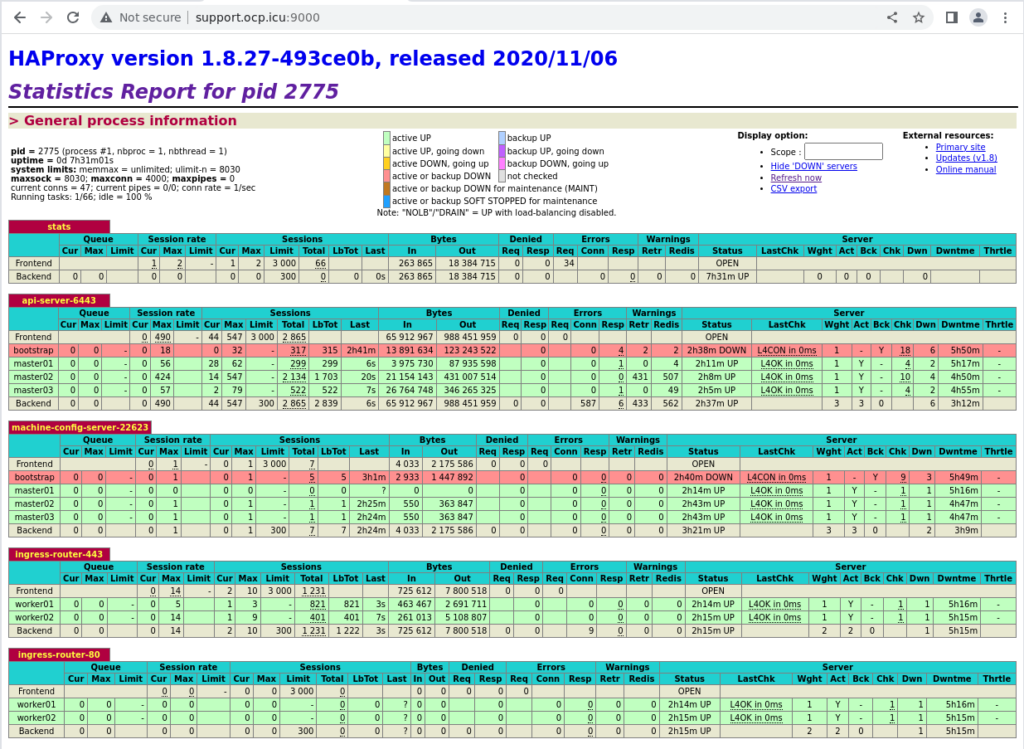
此时查看 haproxy stats 页面可以看到 bootstrap 条目颜色发生变化:

查看状态:
[root@support ~]# ssh core@bootstrap.ocp4.ocp.icu
Red Hat Enterprise Linux CoreOS 413.92.202305021736-0
  Part of OpenShift 4.13, RHCOS is a Kubernetes native operating system
  managed by the Machine Config Operator (`clusteroperator/machine-config`).

WARNING: Direct SSH access to machines is not recommended; instead,
make configuration changes via `machineconfig` objects:
  https://docs.openshift.com/container-platform/4.13/architecture/architecture-rhcos.html

---
This is the bootstrap node; it will be destroyed when the master is fully up.

The primary services are release-image.service followed by bootkube.service. To watch their status, run e.g.

  journalctl -b -f -u release-image.service -u bootkube.service
Last login: Fri Jul 21 01:43:05 2023 from 172.25.1.10
[core@bootstrap ~]$ curl -kIs https://api-int.ocp4.ocp.icu:22623/config/master
HTTP/1.1 200 OK
Content-Length: 357807
Content-Type: application/json
Date: Fri, 21 Jul 2023 01:51:02 GMT
第二阶段:Master 节点重启,批准 worker 节点加入集群
master 节点会再次重启,重启后查看 haproxy stats ,对应的 master 条目变成绿色。
使用 kubeconfig 文件登录集群:
[root@support ~]# export KUBECNFIG=ocp4/ign/auth/kubeconfig
[root@support ~]# oc get nodes
NAME                      STATUS   ROLES                  AGE    VERSION
master01.ocp4.ocp.icu   Ready    control-plane,master   132m   v1.26.6+f245ced
master02.ocp4.ocp.icu   Ready    control-plane,master   172m   v1.26.6+f245ced
master03.ocp4.ocp.icu   Ready    control-plane,master   172m   v1.26.6+f245ced

此时 worker 节点还没有加入,需要对 csr 进行 approve :
oc get csr
#找到处于 Pending 状态的 csr 进行 Approve,会有多个等待 Approve 的 csr
oc adm certificate approve <csr_name>
再次检查节点:
[root@support ~]# oc get nodes
NAME                      STATUS   ROLES                  AGE    VERSION
master01.ocp4.ocp.icu   Ready    control-plane,master   136m   v1.26.6+f245ced
master02.ocp4.ocp.icu   Ready    control-plane,master   175m   v1.26.6+f245ced
master03.ocp4.ocp.icu   Ready    control-plane,master   175m   v1.26.6+f245ced
worker01.ocp4.ocp.icu   Ready    worker                 136m   v1.26.6+f245ced
worker02.ocp4.ocp.icu   Ready    worker                 136m   v1.26.6+f245ced
第三阶段:验证集群
检查 clusteroperators:
[root@support ~]# oc get clusteroperators
NAME                                       VERSION   AVAILABLE   PROGRESSING   DEGRADED   SINCE   MESSAGE
authentication                             4.14.6    True        False         False      124m
baremetal                                  4.14.6    True        False         False      163m
cloud-controller-manager                   4.14.6    True        False         False      174m
cloud-credential                           4.14.6    True        False         False      3h18m
cluster-autoscaler                         4.14.6    True        False         False      163m
config-operator                            4.14.6    True        False         False      164m
console                                    4.14.6    True        False         False      132m
control-plane-machine-set                  4.14.6    True        False         False      163m
csi-snapshot-controller                    4.14.6    True        False         False      164m
dns                                        4.14.6    True        False         False      162m
etcd                                       4.14.6    True        False         False      162m
image-registry                             4.14.6    True        False         False      156m
ingress                                    4.14.6    True        False         False      134m
insights                                   4.14.6    True        False         False      157m
kube-apiserver                             4.14.6    True        False         False      160m
kube-controller-manager                    4.14.6    True        False         False      160m
kube-scheduler                             4.14.6    True        False         False      160m
kube-storage-version-migrator              4.14.6    True        False         False      164m
machine-api                                4.14.6    True        False         False      163m
machine-approver                           4.14.6    True        False         False      163m
machine-config                             4.14.6    True        False         False      161m
marketplace                                4.14.6    True        False         False      163m
monitoring                                 4.14.6    True        False         False      132m
network                                    4.14.6    True        False         False      164m
node-tuning                                4.14.6    True        False         False      134m
openshift-apiserver                        4.14.6    True        False         False      157m
openshift-controller-manager               4.14.6    True        False         False      157m
openshift-samples                          4.14.6    True        False         False      156m
operator-lifecycle-manager                 4.14.6    True        False         False      163m
operator-lifecycle-manager-catalog         4.14.6    True        False         False      163m
operator-lifecycle-manager-packageserver   4.14.6    True        False         False      157m
service-ca                                 4.14.6    True        False         False      164m
storage                                    4.14.6    True        False         False      164m
如果此时发现 console authentication 不正常,且 haproxy 状态页面 ingress route 处于 down 状态的话,有可能是因为 ingress 运行在了 master 节点上,需要将 Pod 删除,让其重新调度到 worker 节点上,相关的 clusteroperator 就会处于 Available 状态。
通过 openshift-install 部署状态:
[root@support ~]# openshift-install wait-for install-complete --log-level=debug --dir=ocp4/ign/
DEBUG OpenShift Installer 4.14.6
DEBUG Built from commit 953477ffa0d19ef8a995258042af8099300a2385
DEBUG Loading Install Config...
DEBUG Loading SSH Key...
DEBUG Loading Base Domain...
DEBUG Loading Platform...
DEBUG Loading Cluster Name...
DEBUG Loading Base Domain...
DEBUG Loading Platform...
DEBUG Loading Networking...
DEBUG Loading Platform...
DEBUG Loading Pull Secret...
DEBUG Loading Platform...
DEBUG Using Install Config loaded from state file
DEBUG Loading Agent Config...
INFO Waiting up to 40m0s (until 6:02PM) for the cluster at https://api.ocp4.ocp.icu:6443 to initialize...
DEBUG Cluster is initialized
INFO Checking to see if there is a route at openshift-console/console...
DEBUG Route found in openshift-console namespace: console
DEBUG OpenShift console route is admitted
INFO Install complete!
INFO To access the cluster as the system:admin user when using 'oc', run 'export KUBECONFIG=/root/ocp4/ign/auth/kubeconfig'
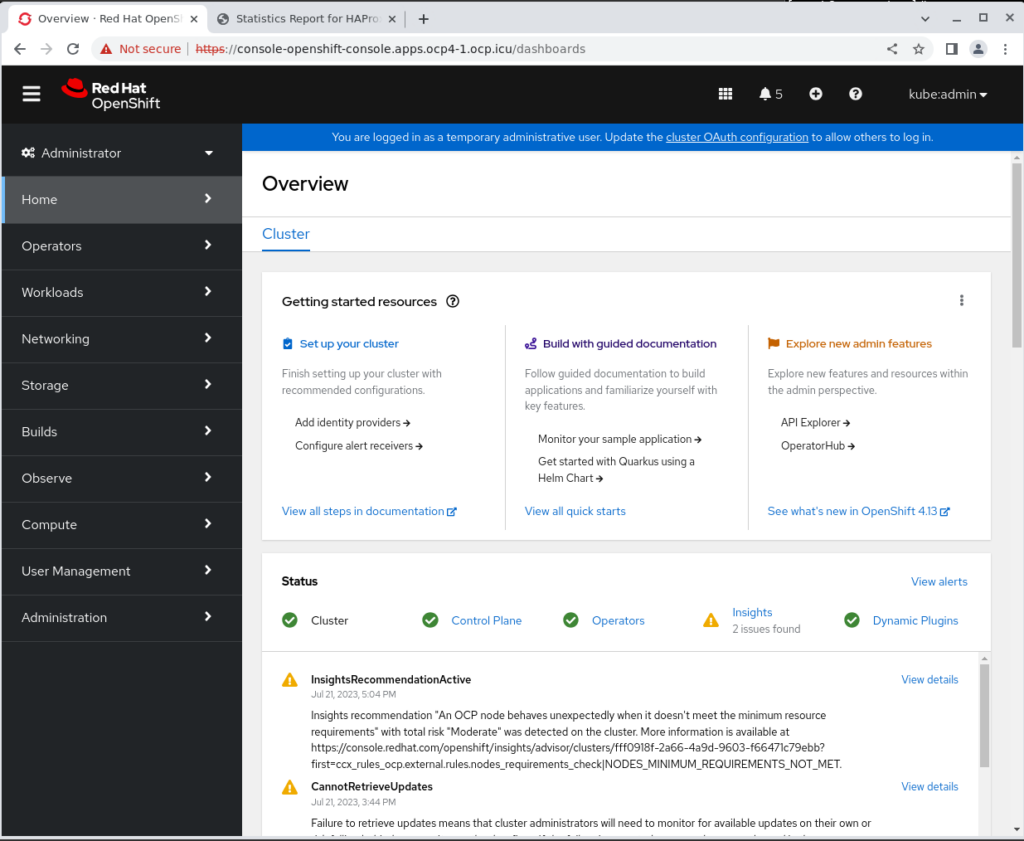
INFO Access the OpenShift web-console here: https://console-openshift-console.apps.ocp4.ocp.icu
INFO Login to the console with user: "kubeadmin", and password: "gcNXq-YVTgP-h8krM-JAGnq"
INFO Time elapsed: 0s使用上述提供的用户名 kubeadmin 和密码 gcNXq-YVTgP-h8krM-JAGnq 登录 Web console。
haproxy stat:
第四阶段:收尾工作,移除 bootstrap
此时可以将 bootstrap 节点从 haproxy 中移除。